Exploring Next.js: Data Handling
At Labcodes, I had the opportunity to actively work on a Next.js project, where I explored various features of the technology for data handling. Next.js offers a wide range of capabilities that make web development more efficient and facilitate code maintenance. Using a blog example, let's analyze different data loading methods, such as static loading, server-side rendering, and client-side rendering.
From version 13 of Next.js, there was a significant change with the introduction of the app router, which alters the way Next.js applications are structured. The app router offers a new paradigm, although the pages router is still compatible and widely used. This change can influence how you work with techniques like Static Site Generation (SSG), Server-side Rendering (SSR), and Client-side Rendering (CSR), so it's important to be aware of this update.
But before diving into specific functions, it is important to understand how Next.js handles data flow. Next.js is a tool that allows you to create modern web applications, offering features such as pre-rendering and automatic routing. These characteristics help optimize performance and improve user experience when handling data.


Static Page Pre-rendering: getStaticProps
In Next.js, getStaticProps is a fundamental function for loading data statically on your pages. But what does this really mean?
It is a function that allows you to pre-render static pages during the compilation of your Next.js application. What I mean is that it allows you to load data statically even before the page is loaded by the user.
Imagine you have a site with content that rarely changes, such as a blog page. Instead of loading this data every time someone accesses the page, you can use getStaticProps to generate these pages statically during the build of the application. This ensures that the pages load faster and provide a smoother user experience.
Let's consider the following scenario with a simple example of how to use getStaticProps on a Next.js page:
import React from 'react';

function Posts({ posts }) {
  return (
    <div>
      <h1>Blog</h1>
      <ul>
        {posts.map((post) => (
          <li key={post.id}>{post.nome}</li>
        ))}
      </ul>
    </div>
  );
}

export async function getStaticProps() {

  const response = await fetch('https://api.exemple.com/posts');
  const data = await response.json();

  return {
    props: {
      posts: data,
    },
  };
}

export default Posts;
In this example, the getStaticProps function is used to fetch data from an external (fictitious) API and pass it to the Posts page as a prop. This data is pre-rendered during the build of the application and sent to the client when they access the page. So, in summary, it allows you to pre-render static pages with dynamic data, providing a faster experience for the user.
Generating Dynamic Pages: getStaticPaths
getStaticPaths is a function that allows generating dynamic pages with static paths during the build process. This is especially useful when you need to create dynamic pages based on variable data, such as product IDs or categories on an e-commerce site.
Let's continue using a Blog application as an example to explain how getStaticPaths works:
Suppose you are building a blog and want to create dynamic pages for each post. Here’s how you can use getStaticPaths for this in 3 steps:
1. Defining Dynamic Routes:
First, you define your dynamic routes in a page component using brackets [] to indicate that these routes are dynamic. For example, you might have a route like /blog/posts/[id], where id is the unique identifier for each post.
2. Implementing getStaticPaths:
Then, you implement the getStaticPaths function in your [id].js page. This function will be responsible for returning a list of all possible id values that your pages can be generated for.
export async function getStaticPaths() {
  const ids = await fetchPostsIds();

  const paths = ids.map((id) => ({
    params: { id: id },
  }));

  return {
    paths: paths,
    fallback: false
  };
}
fetchPostsIds is a fictitious function that fetches the ids of your posts.
3. Rendering the Dynamic Page
Now, let's use the data obtained by the getStaticPaths function to generate the corresponding pages during the build process. So, when a user accesses these pages, Next.js delivers the pre-generated HTML, ensuring faster load times.
export async function getStaticProps({ params }) {
  const postData = await fetchPostData(params.id);
  return {
    props: {
      postData,
    },
  };
}

export default function Post({ postData }) {
  return (
    <div>
      <h1>{postData.title}</h1>
      <p>{postData.content}</p>
    </div>
  );
}
getStaticPaths will define the dynamic routes and generate the pages for each post. The fetchPostData function is fictitious and should fetch the post IDs from the API. Then, we map these IDs to create an array of params objects, where each object has the structure { params: { id: 'post_id' } }.
We use getStaticProps to fetch the post data based on the ID provided by the dynamic route. The fetchPostData function is fictitious and should fetch the post data from the API based on the provided ID.
This is a basic example of how to use getStaticPaths in Next.js to create dynamic pages for blog posts.
Server-Side Data Fetching for Pages: getServerSideProps
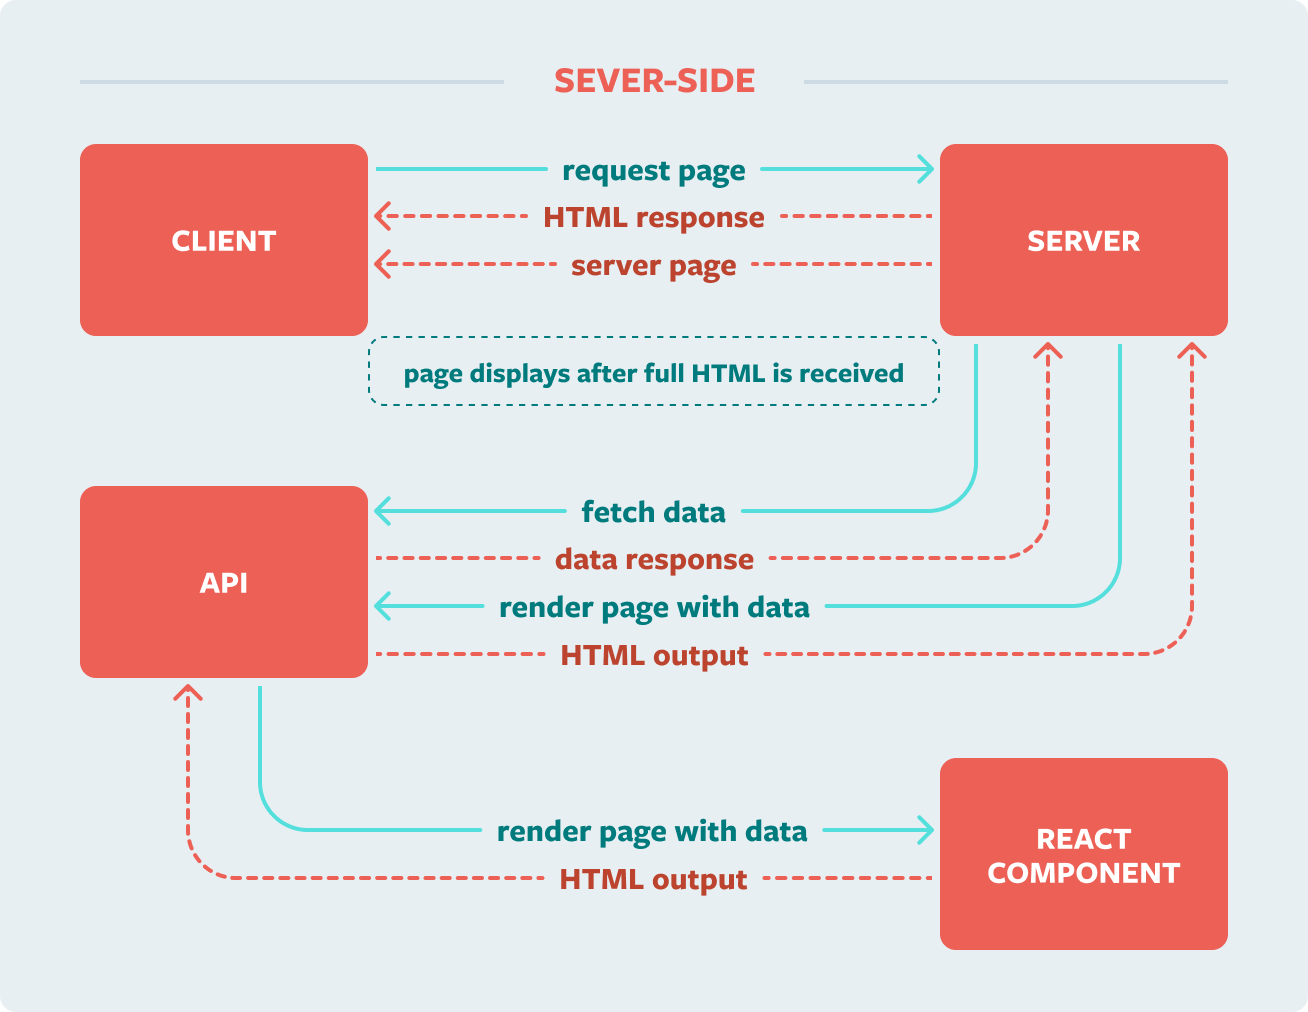
getServerSideProps is a function that allows you to load data dynamically during the server-side rendering of the page. This means that the data is fetched every time the page is requested, ensuring that the data is always up-to-date.
Using the Blog as an example, let's see how to use getServerSideProps:
Suppose you have a blog with multiple posts and a page to display the details of each post. You need to fetch this information from a database or an API every time someone accesses the post details page. This is where getServerSideProps comes in. Here’s how you can use getServerSideProps on a Next.js page to display the details of a blog post:
import axios from 'axios';

function PostPage({ post }) {
  return (
    <div>
      <h1>{post.title}</h1>
      <p>{post.content}</p>
      <p>Autor: {post.author}</p>
    </div>
  );
}

export async function getServerSideProps(context) {
  const postId = context.params.postId;
  const response = await axios.get(`https://api.exemple.com/posts/${postId}`);
  const post = response.data;

  return {
    props: {
      post,
    },
  };
}

export default PostPage;
In this example, the getServerSideProps function receives a context object as an argument, which contains information about the current request, such as URL parameters. We use this information to fetch the post data from the API.
When the page loads, Next.js automatically calls the getServerSideProps function on the server, fetches the post data, and passes it to the PostPage as props. This ensures that the data is always up-to-date and accessible during the page rendering.
A tip when using getServerSideProps is to make sure you are only fetching the data necessary for the specific page. Avoid fetching large volumes of data or performing complex operations within this function, as this can slow down page loading.
It's important to handle possible errors that might occur during data fetching. A common practice is to use try/catch blocks to handle errors and provide feedback to the user.
Interactive Data Fetching: Client-side Fetching
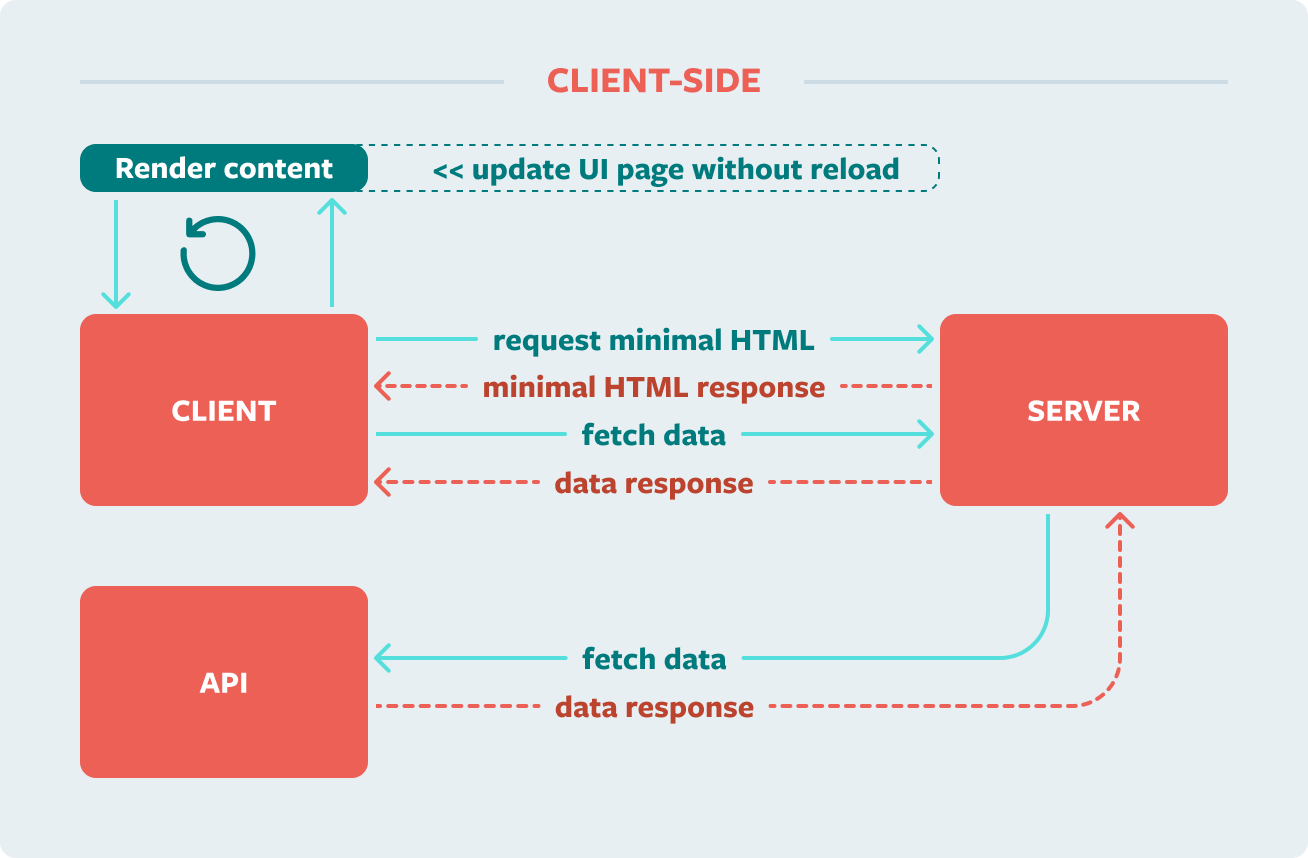
Client-side Fetching occurs when the user's browser requests information from a server and displays it without reloading the entire page. Imagine loading your profile upon logging in or viewing the latest social media posts without refreshing the page; this is what client-side data fetching allows.
This technique is very common and essential for keeping user data updated whenever there is a change or interaction. Instead of waiting for the page to reload, the data is loaded in the background, making the application feel faster and more interactive. This is done by sending a request from the browser (e.g., a GET request) to the server, which fetches the data and sends it back.
Using the same blog example, let's see a simple way to perform client-side fetching:
import { useState, useEffect } from 'react';
import axios from 'axios';

function PostsPage() {
  const [posts, setPosts] = useState([]);

  useEffect(() => {
    const fetchPosts = async () => {
      try {
        const response = await axios.get('https://api.exemple.com/posts');
        setPosts(response.data);
      } catch (error) {
        console.error('Error when searching for posts:', error);
      }
    };

    fetchPosts();
  }, [posts]);
  return (
    <div>
      <h1>Latest Posts</h1>
      <ul>
        {posts.map(post => (
          <li key={post.id}>{post.title}</li>
        ))}
      </ul>
    </div>
  );
}

export default PostsPage;
In this example, we use the useEffect hook (which can be dangerous if its dependencies are not well specified, causing the dreaded infinite loop) to fetch the posts as soon as the PostsPage component is mounted. Upon accessing the page, the data is fetched asynchronously from the fictitious API and stored in the local state using useState. The posts are then rendered on the page as they are received.
An advantage of client-side fetching is the ability to fetch and display data without interrupting the user experience. This means pages can load quickly, and users can interact with the content while the data is being fetched in the background.
Client-side fetching can lead to excessive requests, especially on pages with many components that fetch data independently. To optimize this and ensure a smoother user experience, it is recommended to use libraries like react-query, SWR, or RTK in Next.js projects.
Conclusion
In conclusion, the different Next.js techniques, such as Static Site Generation (SSG), Server-side Rendering (SSR), and Client-side Rendering (CSR), help manage data efficiently, improving performance and user experience.
The getStaticProps and getStaticPaths functions are part of the Static Site Generation (SSG) technique, which pre-renders static pages during the project's build process. This allows pages to load quickly and is ideal for content that does not change frequently.
On the other hand, the getServerSideProps function is related to Server-side Rendering (SSR), which loads data on the server every time the page is accessed. This ensures that the data is always up-to-date when the user visits the page, providing a more consistent experience. Finally, Client-side Rendering (CSR) is implemented with hooks like useEffect and state management libraries to fetch data on the client. This provides a more dynamic and interactive experience, although load speed may vary depending on the data source used.
Each of these techniques has its benefits and specific use cases, and the best choice depends on the particular needs of the project. Thank you for reading, and see you next time!
