Sustainable notifications with react-redux-api-tools
React and Redux are amazing, but they can be tricky sometimes. This is a quick story on how I used react-redux-api-tools to build a reactive notification scheme that can grow up without becoming vulnerable to change.
We are going to start this post by considering a simplified architecture to handle products. We will quickly see what is required for a seamless communication between React and Redux levels using react-redux-api-tools. And we will discuss on how to improve it with a messaging system following a robust design pattern. Here we go.
CRUD with react-redux-api-tools
For starters, let’s assume we are using react-redux-api-tools to manage the data and business logic in a CRUD scenario. For illustration purposes, consider now that we want to CREATE products using our API.
React-Redux architecture
Let’s imagine a simple architecture. A DashboardPage component contains a ProductList and a CreateProductButton, as you can see in Figure 1. The ProductList component simply renders a list of all the current products. The CreateProductButton component is just an interface to open a CreateProductModal. The CreateProductModal component has a form that users can fill in and press a big SAVE button that will trigger some API request. That’s it. That’s our React architecture.
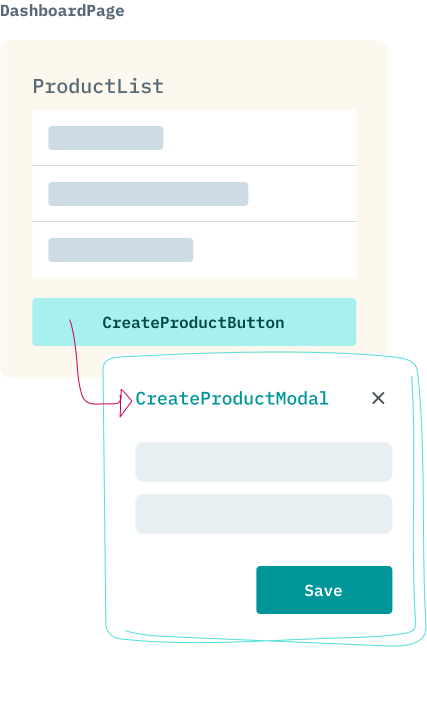
Let’s look closer at CreateProductModal.js, which describes the interface for users to create new products. Our code will probably look a bit like this:
// CreateProductModal.js
...
import React from "react";

export class CreateProductModal extends React.Component {
  ...
  onSubmit = e => {
    ...
    this.props.createProduct(this.state.productName);
  };

  render() {
   // submit form
  }
}
It renders a form that, when submitted, triggers a dispatch that is connected to Redux. The react-redux-api-tools library will help us intermediate those dispatches. The link between the component (at the React level) and the correspondent state handler (at the Redux level) follows the pattern of the following lines:
// CreateProductModal.js
...
import { createProduct } from "../actions";

const mapDispatchToProps = dispatch => ({
  createProduct: productName => dispatch(createProduct(productName))
});

import { connect } from "react-redux";

export default connect(null, mapDispatchToProps)(CreateProductHandler);
On the Redux side, we will have the description of how the action createProduct should be dispatched.
// action.js
...
export const createProduct = productName => {
  const requestData = {
    method: "POST",
    headers: {
      authorization: `Token ${localStorage.token}`
    },
    body: JSON.stringify({
      name: productName
    })
  };
  return {
    types: {
      request: CREATE_PRODUCT_REQUEST,
      success: CREATE_PRODUCT_SUCCESS,
      failure: CREATE_PRODUCT_FAILURE
    },
    apiCallFunction: () => fetch(`/api/products/`, requestData)
  };
};
And we will also have some state management for each action type.
// reducer.js
...
export function productReducers(state = initialState, action) {
  switch(action.type) {
    case CREATE_PRODUCT_REQUEST:
      return {
        ...state,
      };
    case CREATE_PRODUCT_SUCCESS:
      return {
        ...state,
        productList: [...state.productList, action.response.data]
      };
    case CREATE_PRODUCT_FAILURE:
      return {
        ...state,
      };
    default:
      return state;
  }
}
Good. With that, users can actually create some products.
Communicating the API response back to the Component
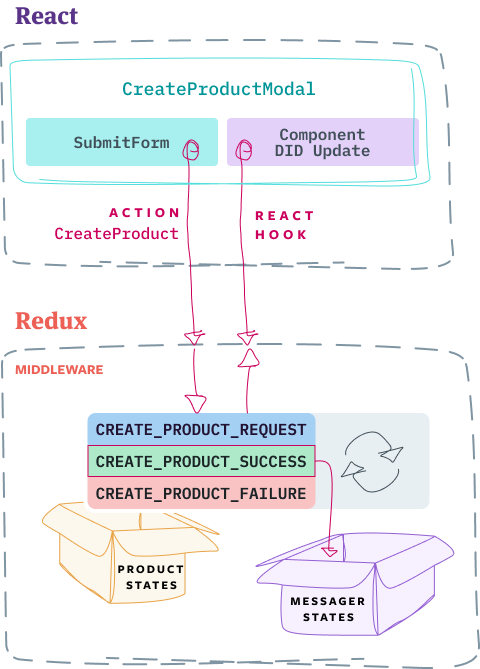
We just implemented a way so that control signals can flow from React deep down to the Redux state store. See Figure 2.
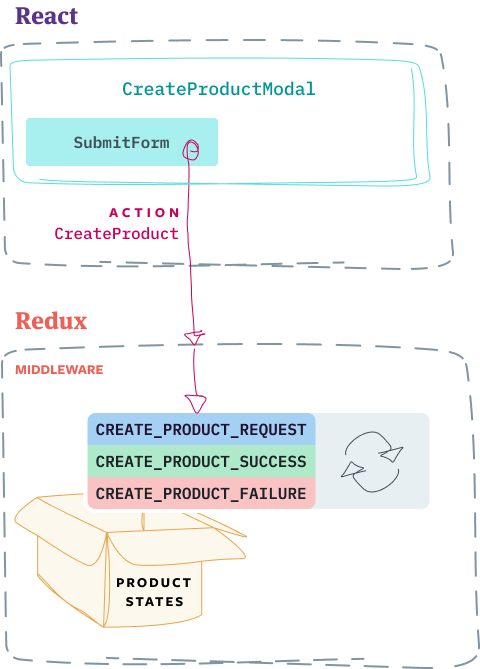
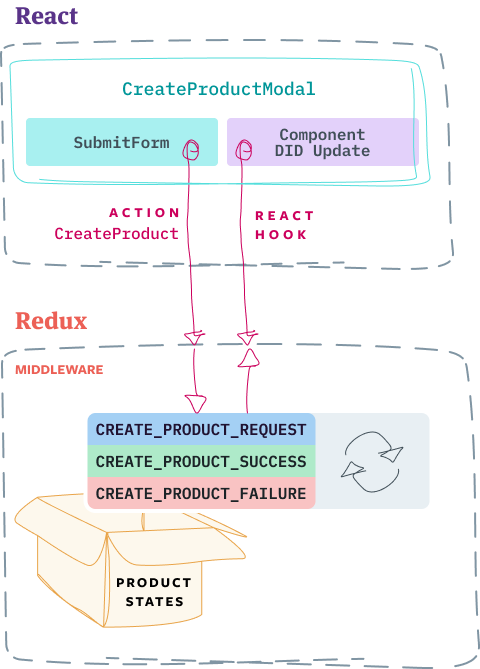
However, what if we need to check if the request’s response was OK from React’s side, so that we can ensure the application reacts accordingly? In other words, how will information flow from all the way back to the surface? How will components that live in React-land know if the call to createProduct resulted in a successful fetch to the API endpoint? There is a list of things that crucially depends on the correct answer for that question. We certainly need to close the modal that contains the form, we also probably need to re-render the list of products with the just created object, or even redirect the user to a new page.
As it is, we can see that Redux only operates over the state variable productList in the case of successful fetches. At this point, one might consider: “Maybe I could build some logic at the component level that checks if productList has changed, even thought that feels wrong”. Indeed, that would not be cool. It is really beyond React’s expected scope, in my opinion. A better approach in fact would be to include a new key in our store. Let’s refactor our reducer:
// reducer.js
...
export function productReducers(state, action) {
  switch(action.type) {
    case CREATE_PRODUCT_REQUEST:
      return {
        ...state,
        createProductIsSuccessfull: null
      };
    case CREATE_PRODUCT_SUCCESS:
      return {
        ...state,
        productList: [...state.productList, action.response.data],
        createProductIsSuccessfull: action.response.ok
      };
    case CREATE_PRODUCT_FAILURE:
      return {
        ...state,
        createProductIsSuccessfull: action.response.ok
      };
    default:
      return state;
  }
}
That way the component could only care about how to react to changes. We can leverage from React’s recommended opportunity to operate on the DOM when some state has been updated using one of its lifecycle methods called componentDidUpdate. So let’s add this to our CreateProductModal.js:
// CreateProductModal.js
export class CreateProductModal extends React.Component {
  ...
  componentDidUpdate(prevProps) {
    const { history, createProductIsSuccessfull } = this.props;
    if (createProductIsSuccessfull && !prevProps.createProductIsSuccessfull) {
      this.handleCloseModal();
      history.push("/dashboard-page");
    }
  }
Of course, we would also have to make the React-Redux link. We just have to map the createProductIsSuccessfull state from the Redux store into the set of props of our component et voilá.
const mapStateToProps = state => ({
  createProductIsSuccessfull: state.productReducers.createProductIsSuccessfull
});
...
export default connect(mapStateToProps, mapDispatchToProps)(CreateProductHandler);
We can think of it as if the component is listening to the Redux store. See Figure 3. Changes over that specific state triggered at any point of the application will be detected by this check.
Very good! Now when users create new products, they are automatically redirected back to DashboardPage. And you know what, it would be nice if the users could actually know if everything went OK. It would be very natural to show them something like a success notification saying “Hey, everything went well, keep going”.
Messager
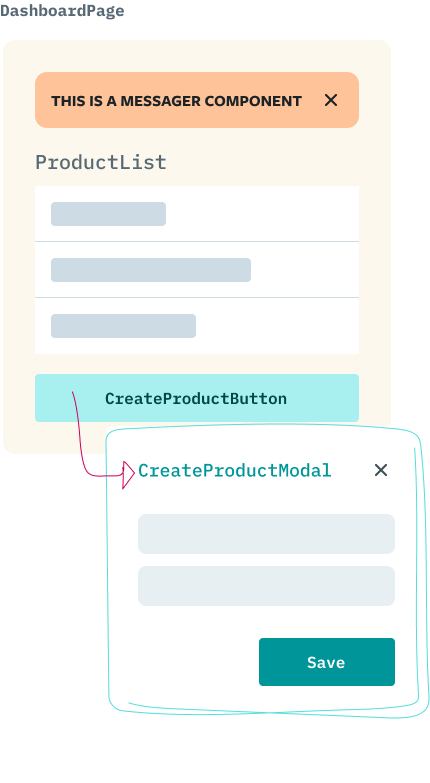
DashboardPage might actually be a perfect fit for displaying such notifications. We can even isolate their behavior into a specialized component. Call it Messager. It would be included in the DashboardPage alongside every other component we already described (see Figure 4):
// DashboardPage.js
...
export default class DashboardPage extends React.Component {
  render() {
    return (
      <div className="dashboardPage">
        <Messager />
        <ProductList />
        <CreateProductButton />
      </div>
    );
  }
}
Step solution
First, let me show how I initially tried to build that. I emphasize that this is not a wrong solution, but it makes more difficult to scale than what it might actually be. You will see why. The reason I’m showing this first is that it looks like a very common attempt, since it is really straight forward to implement.
We would just have to create a new key on our productReducers store:
// reducer.js
...
    case CREATE_PRODUCT_REQUEST:
      return {
        ...
        createProductSuccessMessage: ""
     };
    case CREATE_PRODUCT_SUCCESS:
      return {
        ...
        createProductSuccessMessage: "Product created successfully."
      };
...
So we could implement our Messager component with something like this:
// Messager.js
...
export class Messager extends React.Component {
  ...
  render() {
    const { createProductSuccessMessage } = this.props;
    return (
      <div>
        {createProductSuccessMessage ? (
          <Alert variant="success">
            {createProductSuccessMessage}
          </Alert>
        ) : null}
      </div>
    );
  }
}
...
But wait, there is something very important missing in our implementation so far. There is no way we can dismiss those messages once they are displayed! Let’s solve that.
We would essentially need to reset the value of the state createProductSuccessMessage. This is a Redux responsibility though. Thus we would also need some React interface to trigger the action that will perform such a reset. So we could add something like this to our action.js file:
// action.js
...
export function clearCreateProductSuccessMessage() = ({
  type: CLEAR_CREATE_PRODUCT_SUCCESS_MESSAGE
});
And add one more action type to our productReducers:
// reducer.js
    ...
    case CLEAR_CREATE_PRODUCT_SUCCESS_MESSAGE:
      return {
        ...state,
        createProductSuccessMessage: ""
      };
Finally, we could refactor our Messager component into a dismissable alert:
// Messager.js
...
export class Messager extends React.Component {
  ...
  handleCloseCreateProductSuccessMessage = () => {
    const { clearCreateProductSuccessMessage } = this.props;
    clearCreateProductSuccessMessage();
  };

  render() {
    const { createProductSuccessMessage } = this.props;
    return (
      <div>
        {createProductSuccessMessage ? (
          <Alert
            variant="success"
            onClose={() => this.handleCloseCreateProductSuccessMessage()}
            dismissible
          >
            {createProductSuccessMessage}
          </Alert>
        ) : null}
      </div>
    );
  }
}
...
Oof. Now we have got everything we need. Cool. I said that this would be the easy way, right? But not for long if we keep that pace. Because now we also need to implement something else in our application. It might be an operation like EDIT, DELETE, or UPDATE over a product, it might be something related to another model that also requires some notification on DashboardPage etc. If we quickly go over that ritual again for, let’s say, the DELETE case, we would soon realize that we could do that one more time, maybe two, but not only our patience would definitively explode from the third time on as would also the number of lines in our code. Let’s check it.
Code explosion
From the Redux side, we would have to describe how the action deleteProduct should be dispatched. And let’s take the chance to also implement the action that resets the value of a state deleteProductSuccessMessage.
// action.js
...
export const deleteProduct = productId => {
  const requestData = {
    method: "DELETE",
    headers: {
      authorization: `Token ${localStorage.token}`
    }
  };
  return {
    types: {
      request: DELETE_PRODUCT_REQUEST,
      success: DELETE_PRODUCT_SUCCESS,
      failure: DELETE_PRODUCT_FAILURE
    },
    extraData: {
      productId
    },
    apiCallFunction: () => fetch(`/api/products/${productId}/`, requestData)
  };
};

export function clearDeleteProductSuccessMessage() = ({
  type: CLEAR_DELETE_PRODUCT_SUCCESS_MESSAGE
});
We will also have to update the productReducers with:
// reducer.js
...
    case DELETE_PRODUCT_REQUEST:
      return {
        ...state,
        deleteProductIsSuccessfull: null,
        deleteProductSuccessMessage: ""
     };
    case DELETE_PRODUCT_SUCCESS:
      const productListAfterDelete = [...state.todoLists];
      productListAfterDelete.splice(action.extraData.productId, 1);
      return {
        ...state,
        productList: productListAfterDelete,
        deleteProductIsSuccessfull: action.response.ok,
        deleteProductSuccessMessage: "Product deleted successfully."
      };
    case DELETE_PRODUCT_FAILURE:
      return {
        ...state,
        deleteProductIsSuccessfull: action.response.ok
      };
    case CLEAR_DELETE_PRODUCT_SUCCESS_MESSAGE:
      return {
        ...state,
        deleteProductSuccessMessage: ""
      };
// ...
Now, at the React level we would have to include something like this into our Messager component:
// Messager.js
...
export class Messager extends React.Component {
  ...
  handleCloseCreateProductSuccessMessage = () => {
    const { clearCreateProductSuccessMessage } = this.props;
    clearCreateProductSuccessMessage();
  };

  handleCloseDeleteProductSuccessMessage = () => {
    const { clearDeleteProductSuccessMessage } = this.props;
    clearDeleteProductSuccessMessage();
  };

  render() {
    const { deleteProductSuccessMessage } = this.props;
    return (
      <div>
        {createProductSuccessMessage ? (
          <Alert
            variant="success"
            onClose={() => this.handleCloseCreateProductSuccessMessage()}
            dismissible
          >
            {createProductSuccessMessage}
          </Alert>
        ) : null}
        {deleteProductSuccessMessage ? (
          <Alert
            variant="success"
            onClose={() => this.handleCloseDeleteProductSuccessMessage()}
            dismissible
          >
            {deleteProductSuccessMessage}
          </Alert>
        ) : null}
      </div>
    );
  }
}
...
Oh my. Can you smell that? That’s right. This is the point in which our clean crystalline design starts to slowly rot into legacy code.
Defusing the bomb
One thing could immediately alleviate code explosion. We may have a single state containing the list of messages to be displayed, instead of an individual state for each message. Let’s look at our current state variables. Our suggestion is to avoid any particular XSuccessMessage, and instead use something like a buffer to store any kind of success message that might appear. May we call it messageList, why not.
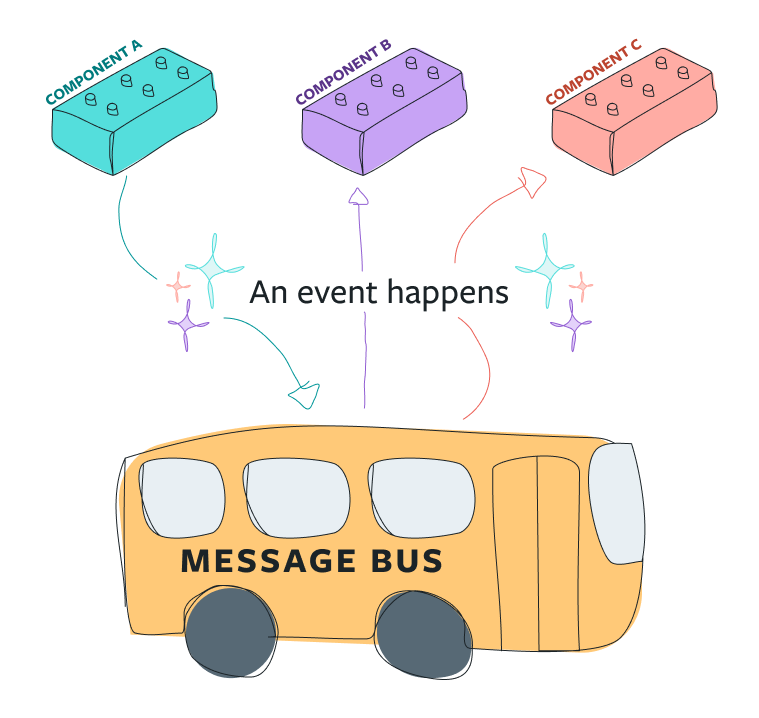
We want to have something similar to what is illustrated by Figure 5, where three different components are communicating to one another through events. It is actually a widespread abstraction that comes with major advantages, such as guaranteed delivery for asynchronous communications, ease of scalability and broadcast capabilities mainly due to enabling a highly decoupled application.
So let’s start by removing all states related to “messaging”, such as createProductSuccessMessage and deleteProductSuccessMessage, from our reducer.js file. Let’s also make functions like clearCreateProductSuccessMessage or clearDeleteProductSuccessMessage live in a separate messager/action.js. Now, in a new messager/reducer.js, we can have something like:
// messager/reducer.js
...
    case CREATE_PRODUCT_SUCCESS:
      return {
        ...state,
        messageList: [...state.messageList, "Product created successfully."]
      };
    case DELETE_PRODUCT_SUCCESS:
      return {
        ...state,
        messageList: [...state.messageList, "Product deleted successfully."]
     };
...
Then, we can refactor our Messager.js component into something like this:
// Messager.js
...
  handleCloseMessage = index => {
    const { clearSuccessMessage } = this.props;
    clearSuccessMessage(index);
  };
  render() {
    const { messageList } = this.props;
    return (
      <div>
        {messageList.map((message, index) => (
          <Alert
            variant="success"
            onClose={() => this.handleCloseMessage(index)}
            dismissible
            key={`Message: ${message.id}`}
          >
            {message}
          </Alert>
        ))}
      </div>
    );
  }
}
...
A very important thing to notice here is that now we have only a single action to clear the notification buffer: clearSuccessMessage, which is the last thing left for us to implement. But that is quite straight forward as well. Once clearSuccessMessage is triggered, receiving the index to which message should be cleared out, a simple dispatch like:
// messager/action.js
export const clearSuccessMessage = index => ({
  type: CLEAR_SUCCESS_MESSAGE,
  extraData: {
    index
  }
});
could activate the following Redux behavior:
    case CLEAR_SUCCESS_MESSAGE:
      const newMessageList = [...state.messageList];
      newMessageList.splice(action.extraData.index, 1);
      return {
        ...state,
        messageList: newMessageList
      };
Now we have clustered notification-related actions and reducers into an isolated module, something similar to what is shown in Figure 6. And that is it! The bomb has been defused. We are safe, for now.
Conclusions
In this post, we saw how to enable key requirements for an efficient React-Redux interface to a CRUD architecture. We reflected on a common pitfall that might arise when one tries to tie up component-level behavior with state-level responsibilities. And we came up with a simple solution to design a notification scheme that can afford scaling. We learned that we can abstract the responsibility of communication from individual components. With such isolation, we can avoid code replication that could severally freeze our codebase.
Do you see any drawbacks on the presented solution? How do you think we could improve it? Let us hear from you.
